🐟 Target the Tiniest Species with Confidence:
✅ Size #30 Pre-Snelled Hooks
✅ Micro Master 1-2-3 Kit Assortment Pre-Snelled Hooks ✅ Micro Floats for Ultra-Finesse
✅ Tapered Leaders for Smooth Presentations
➡️ Shop Micro Fishing Essentials Now.
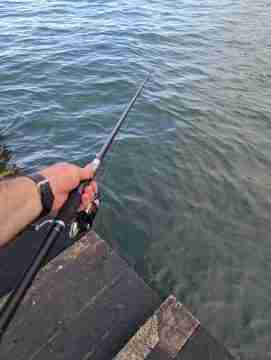
When I first started micro fishing I quickly learned that strong knots aren’t just helpful—they’re essential. 🧵 One memorable day fishing the ocean rocks, a secure Lillian loop saved me from losing what could have been the catch of the season. 🌊 That moment taught me a lifelong lesson: a reliable leader connection can make or break your day on the water.
This guide covers everything you need to know about Lillian loops from the basics to advanced tips, DIY Lillian strings, and real-world applications. Whether you’re new to hand pole fishing, tenkara fishing, or seasoned in micro fishing mastering this technique is a must.
🧰 What Is the Lillian Loop?
The Lillian loop is a specialized attachment method designed for connecting your leader to the Lillian string—a short braided cord found at the tip of traditional tenkara rods and hand poles. This method ensures:
✅ A secure, slip-resistant connection
✅ Fast leader changes—perfect for switching setups on the go
✅ Protection for your delicate rod tip, preventing accidental breakage
What began as a traditional Japanese tenkara technique has become a global staple in micro fishing rods where ultra-light gear and delicate precision are everything.
🪢 Materials You’ll Need
✅ Hand Pole with a pre-attached Lillian string (or DIY your own, see below)
✅ Tapered Knotless Leader (high-quality leaders from The Art of Micro Fishing work perfectly)
✅ Scissors (for trimming any excess line)
💡 Pro Tip: If your hand pole doesn’t have a Lillian string, you can DIY one using Dacron fly reel backing—it’s strong, flexible, and micro-friendly.
📖 Step-by-Step Guide to Tying the Perfect Lillian Loop
1️⃣ Prepare Your Gear
- Select a tapered knotless leader or mainline (pre-tied loop recommended or tie your own).
- Moisten the leader for a tighter, smoother knot and to prevent line damage.
2️⃣ Form the Leader Loop
- Ensure your leader already has a small loop knot at the end.
- Twist the loop around itself to create two smaller loops—this forms a secure figure 8 opening for the Lillian string. This is option 1.
- Tie an arbor knot in your leader or mainline. Tie an overhand then tie another overhand 1/2 inch in and use that. The 1/2 overhang lets you take the leader off easily.
3️⃣ Insert and Secure the Lillian String
- Pass the Lillian string through both loops or the arbor knot.
- Pull the leader gently, tightening it around the Lillian.
- Test with a firm tug to make sure everything locks in place.
✅ Done right, this connection is strong, secure, and allows fast leader changes.
⚠️ Common Mistakes & How to Avoid Them
❌ Loose Wraps: Always snug the wraps tightly so nothing slips mid-cast.
❌ Skipping the Strength Test: Before every trip test the knot by giving it a firm pull.
❌ Trimming Too Close: Leave a slight tag end to avoid accidental unraveling.
💪 Advanced Pro Tips for Extra Security
- Double Lillian Loop: Create two loops in the Lillian string itself for a double-locking effect.
- Material Matters: Use fluorocarbon leaders for clear water finesse and monofilament leaders for added flexibility in tight spaces.
🛠️ DIY: Making Your Own Lillian String
If your hand pole arrived without a Lillian string, no worries. Here’s how to craft your own:
Materials Needed
- Dacron Fly Reel Backing (braided & tough)
- Super Glue (cyanoacrylate for best adhesion)
- Needle (for threading if using hollow tips)
- Scissors
✂️ Making the Lillian String
- Cut 6 inches of Dacron.
- Tie a small knot at one end and add a drop of super glue.
- Let it fully cure before attaching to your rod.
🔗 Attaching the Lillian String to Your Hand Pole
Option 1: Internal Threading (For Hollow Tips)
- Thread the Dacron through the hollow rod tip using a needle.
- Tie a knot at the inner tip to secure it and pull back out to snug.
- Test with gentle pressure and trim the excess and tie a knot.
Option 2: External Gluing (For Solid Tips)
- Apply super glue directly to the outer tip.
- Slide the Dacron over the glued area.
- Add another drop of glue for added hold.
- Tie a knot at the end for your lillian string.
This DIY approach ensures your rod gets a perfectly sized, durable Lillian string.
🌊 Real-World Applications: Field-Tested Success
On a recent micro fishing trip, I needed to switch leaders fast due to changing water clarity. The Lillian loop’s quick-change capability kept me fishing instead of fumbling with knots. 💨
Even in snags and bigger fish hook ups the connection held up—proof that this method works equally well on calm lakes or rocky ocean shores and bigger fish.
✅ Why the Lillian Loop Matters
- Efficiency: Swap leaders in seconds.
- Strength: Holds firm even under tension.
- Flexibility: Works with all leader types (fluoro, mono, braid).
📷 Bonus: Coming Soon – Illustrated Guide & Video Tutorial!
To make learning even easier we’re working on a step-by-step visual guide and how-to video showing every stage of tying and testing the Lillian loop.
🔗 Respect the Tradition, Master the Technique
The Lillian loop and arbor knot is a humble knot with deep roots in Japanese fishing culture. By mastering it you’re not just learning a knot—you’re connecting to centuries of angling wisdom that values finesse, simplicity, and efficiency. 🎌
🎣 Ready to Level Up Your Micro Fishing?
Take your skills further—share your setups and catches with us on Instagram, Facebook, YouTube, and TikTok! Use the hashtag #artofmicrofishing to join our community and get featured.
Tight lines and happy fishing! 🎣🌊
🐟 Target the Tiniest Species with Confidence:
✅ Size #30 Pre-Snelled Hooks
✅ Micro Master 1-2-3 Kit Assortment Pre-Snelled Hooks ✅ Micro Floats for Ultra-Finesse
✅ Tapered Leaders for Smooth Presentations
➡️ Shop Micro Fishing Essentials Now.